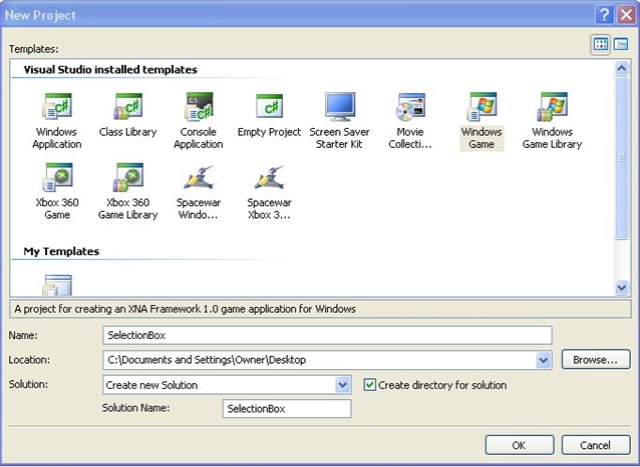
To make the mouse pointer visible in the game, add the following line of code to the Initialize method.
Next, let's add the image to the project that we are going to use when we draw the selection box rectangle. This image consists of a transparent area, a rectangular white dash and then some more transparent area. (the image does not appear transparent when viewed through the web, but the dark areas are the transparent areas)
The image is provided in the source file for this tutorial. Save the image to your project folder and now we will add it to the project itself.
To add an image to the game project. Right-click on the project name and select "Add -> Existing Item". This will open the "Add Existing Item" dialog.
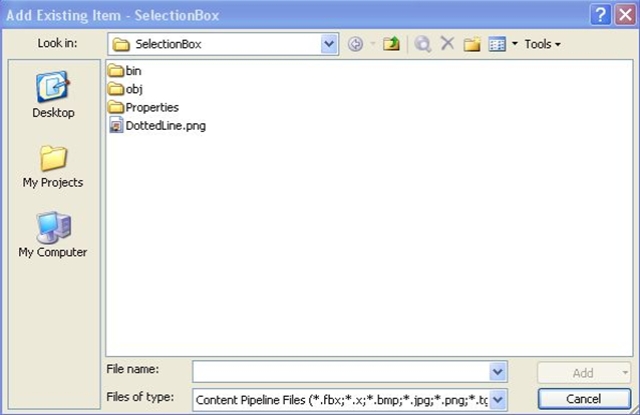
This dialog box defaults to show only Visual C# Files which mean you will not see any images until you change this. We want to use the Content Pipeline to manage our images so from the "Files of type:" combo box, select "Content Pipeline Files". Now you should be able to navigate to your image. Select the image and then click the "Add" button. You have now successfully added an image to your game project.
Drawing the Image:
We have created the game project, made the mouse pointer visible and added an image, now let's go ahead and write a little code to make that image draw on the screen.
Start by adding two new objects to the class. These objects will take care of drawing the image and storing the image.
SpriteBatch mSpriteBatch;
Texture2D mDottedLine;
This "SpriteBatch" object is used to draw your images. The "Texture2D" object is used to store your images. Both of these types of objects are used very frequently when creating 2D games with XNA, so learning to use them and all that they can do becomes very important. We will only be scratching the surface of what you can do with just these two objects in this tutorial.
Now that we our objects, we need to initialize them and use them. To initialize the objects, we are going to add some code to the "LoadGraphicsContent" method that was automatically created for us when we selected the Windows Game template.
Add the following code to the "LoadGraphicsContent" method.
protected override void LoadGraphicsContent(bool loadAllContent)
{ if (loadAllContent)
{ // TODO: Load any ResourceManagementMode.Automatic content
//Initialize the sprite batch
mSpriteBatch = new SpriteBatch(this.graphics.GraphicsDevice);
//Create the Content Manager object to load images
ContentManager aLoader = new ContentManager(this.Services);
//Use the Content Manager to load the Dotted Line image into the Texture2D object
mDottedLine = aLoader.Load<Texture2D>("DottedLine") as Texture2D;
}
// TODO: Load any ResourceManagementMode.Manual content
}
First, we initialized our SpriteBatch. If we had forgotten to initialize it, when we tried to use this object later, we would have gotten an error that "Object reference was not set to an instance of an object". When developing with objects, this becomes a fairly frequent error to see. Once you get it, you know that somewhere in your code you forgot to initialize an object.
Then we created a new object, a "ContentManager" object, to be used just within this method. The ContentManager object is used to load our images.
Finally, we used the newly created "ContentManager" object to load our "DottedLine" image and store it in our Texture2D object.
Now that we have initialized all of our objects, we can draw our Dotted line to the screen. To actually draw the image to the screen, we will add some code to the "Draw" method. The "Draw" method is another one of the base methods that was automatically created for us when we made a new Windows Game project.
Add the following code to the "Draw" method.
protected override void Draw(GameTime gameTime)
{ graphics.GraphicsDevice.Clear(Color.Black);
// TODO: Add your drawing code here
mBatch.Begin();
mBatch.Draw(mDottedLine, new Rectangle(0, 0, 10, 5), Color.White);
mBatch.End();
base.Draw(gameTime);
}
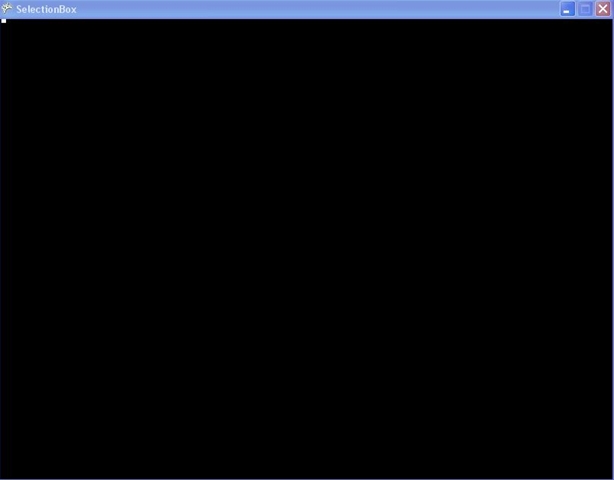
First, we are going to change the color we are clearing the screen with from the default "CornflowerBlue" to "Black". Our image is a white dotted line so it just shows up a bit better on a black background.
Next, we let the SpriteBatch object know that we are ready to begin drawing some things.
Then we draw our image using the SpriteBatch. In this case, we told the SpriteBatch which image we wanted to draw (our DotteLineTexture2D object), where we wanted to draw it, how big we wanted the image to be and what color we wanted to shade the image. We told the SpriteBatch where we wanted to draw the image and how big we wanted to make it when we passed in that Rectangle object. The first two values of the Rectangle object tell the SpriteBatch which x, y location we want to start drawing our image. In this case, we told the SpriteBatch that we wanted to draw it at the (0,0) point on the screen which is the upper left of the screen. The next two values of the Rectangle object tell the SpriteBatch how wide and how high we want the image to be. In this case we used a width of 10 pixels and a height of 5 pixels. Finally, the Color value we chose was White. This tells the SpriteBatch that we don't want to apply any coloring to the image at this time.
Last, we tell the SpriteBatch object that we are done drawing are images.
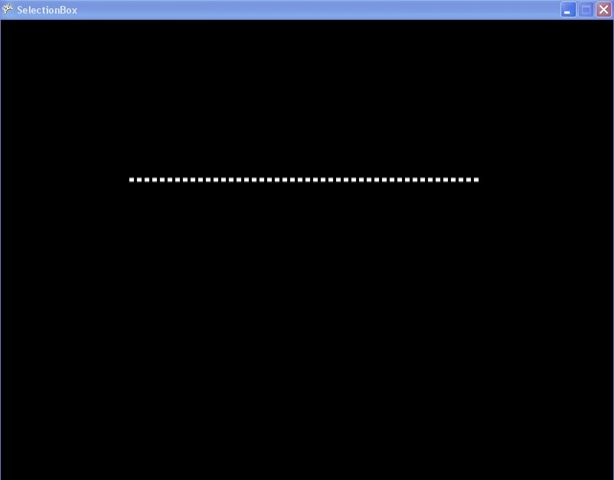
Now that we have created our objects and drawn the image to the screen, let's do a quick build  to make sure that we have coded everything properly and that there are no errors.
When you do the build you should be presented with a screen like this one. Just black with a little with dash in the upper left corner. Pretty exciting right?
Drawing the Image where the Left Click occurs:
Now that we are actually drawing the image to the screen, let's enhance the code to only draw the image when a left click occurs. For this project, the player is going to start making the selection box when they left click with the mouse and we are going to start achieving that effect by drawing the image where they left click. We will erase the image when they release the left click to simulate what happens when the player is finished with their selection box.
So left click, draw the image at the current mouse location and maintain it at that location. Release the left mouse button, erase the image. Got it?
To start, add the following code to the top of your class after the SpriteBatch and Texture2D object declarations.
Rectangle mSelectionBox;
MouseState mPreviousMouseState;
The Rectangle object (mSelectionBox), will be use to track the current location of the mouse click (the x,y location the mouse click occurred). The MouseState object (mPreviousMouseState) will be used to store the previous state the mouse was in (was the left button clicked or released last time).
First we will need to initialize these two objects. Add the following code to the Initialize method:
protected override void Initialize()
{ // TODO: Add your initialization logic here
//Make the mouse pointer visible in the game window
this.IsMouseVisible = true;
//Initialize the Selection box's rectangle. Currently no selection box is drawn
//so set it's x and y position to -1 and it's height and width to 0
mSelectionBox = new Rectangle(-1, -1, 0, 0);
//Initialize the previous mouse state. This stores the current state of the mouse
mPreviousMouseState = Mouse.GetState();
base.Initialize();
}
Your beautiful mouse visible code should still remain and we have now added our initialization for the SelectionBox rectangle object and the previous state of the Mouse.
The mSelectionBox variable is started with no position (the game has just started so the player has not left clicked yet so there should not be any x or y position set).
The PreviousMouseState variable just gets the current state of the mouse when the game starts.
Next, we need to add some code to the Update method to detect when the left mouse button is clicked and release and to store the current position of the mouse when the player does click the left mouse button.
Add the following code to the Update method:
protected override void Update(GameTime gameTime)
{ // Allows the default game to exit on Xbox 360 and Windows
if (GamePad.GetState(PlayerIndex.One).Buttons.Back == ButtonState.Pressed)
this.Exit();
// TODO: Add your update logic here
//Get the current state of the Mouse
MouseState aMouse = Mouse.GetState();
//If the user has just clicked the Left mouse button, then set the start location for the Selection box
if (aMouse.LeftButton == ButtonState.Pressed && mPreviousMouseState.LeftButton == ButtonState.Released)
{ //Set the starting location for the selection box to the current location
//where the Left button was initially clicked.
mSelectionBox = new Rectangle(aMouse.X, aMouse.Y, 0, 0);
}
//If the user has released the left mouse button, then reset the selection square
if (aMouse.LeftButton == ButtonState.Released)
{ //Reset the selection square to no position with no height and width
mSelectionBox = new Rectangle(-1, -1, 0, 0);
}
//Store the previous mouse state
mPreviousMouseState = aMouse;
base.Update(gameTime);
}
When the game updates, the first thing that is done is that we get the current state of the mouse (what buttons are currently pressed and the current location of the mouse).
Next, we check to see if the left mouse button is currently pressed. If it was AND it previous was not pressed (so the player has JUST clicked it), then store the current x, y location of the mouse. So mSelectionBox gets the current X (aMouse.X) and the current Y (aMouse.Y) position of where the mouse pointer is on the screen. This is where we will be drawing the image.
Now we check to see if the left button has been released. If it has, we will remove the X, Y location for the image and no longer draw it (we're only going to draw the image while the player keeps the Left button click remember?).
Finally, we update the mPreviousMouseState variable with the current mouse state. That way we can compare next time through the Update method what the state of the mouse was in the previous iteration.
Well, now we've Initialized our object, done some logic in the Update and the final thing to do is to get some visual result. To accomplish that we will change the code in our Draw method.
Add the following code to the Draw method:
protected override void Draw(GameTime gameTime)
{ graphics.GraphicsDevice.Clear(Color.Black);
// TODO: Add your drawing code here
//Begin drawing with the batch
mSpriteBatch.Begin();
if (mSelectionBox.X != -1 && mSelectionBox.Y != -1)
{ mSpriteBatch.Draw(mDottedLine, new Rectangle(mSelectionBox.X, mSelectionBox.Y, 10, 5), Color.White);
}
//End the drawing with the batch
mSpriteBatch.End();
base.Draw(gameTime);
}
So we are still clearing the screen to Black (instead of the lovely CornflowerBlue), however we've added a bit more logic to the drawing of our image.
First, we check to make sure that the current X and Y values for the mSelectionBox variable are not -1. When they are -1, that means the player has released the Left mouse button and we should no longer be drawing the dashed line image.
If the values are not -1, then we will draw our dotted line image at the current position for the selection box (that is, wherever the player first left clicked).
Well, that's a lot. Let's go ahead and give the changes we have made a quick test run to make sure we have done everything correctly. Do a build and you should see the black screen. Nothing should be drawn to the screen at first. Now, left click and you should see the small dash drawn. Keep the left mouse button clicked and wave your mouse around. The image should remain in the original location of the click. Now release the mouse button and the image should disappear.
Did you get the results you expected? Ready to add some more functionality?
Drawing a Horizontal line:
We have a dash, but a dash is a far cry from a box. Let's get a little close to our final goal by drawing a horizontal line. We want the line to start where the player clicks the left mouse button and to expand and shrink in the X direction as they move their mouse horizontally.
To begin drawing our horizontal line, we will need to track where the Mouse is moving to in the horizontal direction as the player keeps the left mouse button pressed. This will require us to add some more code to the Update method.
Add the following code to the Update method:
protected override void Update(GameTime gameTime)
{ // Allows the default game to exit on Xbox 360 and Windows
if (GamePad.GetState(PlayerIndex.One).Buttons.Back == ButtonState.Pressed)
this.Exit();
// TODO: Add your update logic here
//Get the current state of the Mouse
MouseState aMouse = Mouse.GetState();
//If the user has just clicked the Left mouse button, then set the start location for the Selection box
if (aMouse.LeftButton == ButtonState.Pressed && mPreviousMouseState.LeftButton == ButtonState.Released)
{ //Set the starting location for the selection box to the current location
//where the Left button was initially clicked.
mSelectionBox = new Rectangle(aMouse.X, aMouse.Y, 0, 0);
}
//If the user is still holding the Left button down, then continue to re-size the
//selection square based on where the mouse has currently been moved to.
if (aMouse.LeftButton == ButtonState.Pressed)
{ //The starting location for the selection box remains the same, but increase (or decrease)
//the size of the Width and Height but taking the current location of the mouse minus the
//original starting location.
mSelectionBox = new Rectangle(mSelectionBox.X, mSelectionBox.Y, aMouse.X - mSelectionBox.X, 0);
}
//If the user has released the left mouse button, then reset the selection square
if (aMouse.LeftButton == ButtonState.Released)
{ //Reset the selection square to no position with no height and width
mSelectionBox = new Rectangle(-1, -1, 0, 0);
}
//Store the previous mouse state
mPreviousMouseState = aMouse;
base.Update(gameTime);
}
There's only one section of the code above that has changed from before. We added a new if...then block to check to see if the Mouse button is currently pressed and if it is, then we update the Width of our mSelectionBox variable.
To update the width, we take the current X location (horizontal position) of the mouse and subtract the original point the player clicked the mouse. This will tell us how wide (or long) we need to make our horizontal line for our selection box.
That little block was all we needed to add to our update logic. However, to actually draw the horizontal line, we need to add a new method to our class. This method will draw our horizontal line at a specified Y position.
Add the following method to the class:
private void DrawHorizontalLine(int thePositionY)
{ //When the width is greater than 0, the user is selecting an area to the right of the starting point
if (mSelectionBox.Width > 0)
{ //Draw the line starting at the starting location and moving to the right
for (int aCounter = 0; aCounter <= mSelectionBox.Width - 10; aCounter += 10)
{ if (mSelectionBox.Width - aCounter >= 0)
{ mSpriteBatch.Draw(mDottedLine, new Rectangle(mSelectionBox.X + aCounter, thePositionY, 10, 5), Color.White);
}
}
}
//When the width is less than 0, the user is selecting an area to the left of the starting point
else if (mSelectionBox.Width < 0)
{ //Draw the line starting at the starting location and moving to the left
for (int aCounter = -10; aCounter >= mSelectionBox.Width; aCounter -= 10)
{ if (mSelectionBox.Width - aCounter <= 0)
{ mSpriteBatch.Draw(mDottedLine, new Rectangle(mSelectionBox.X + aCounter, thePositionY, 10, 5), Color.White);
}
}
}
}
So we have two cases here. When the Width of the horizontal line is greater than zero, the player has moved the mouse pointer from the start position (where they initially left clicked) and to the right of the screen. This gives the horizontal line a positive width. The second case is when the player has move the mouse pointer from the start position and to the left of the screen. this will give the Width a negative value. Each of those cases need to be handled separately. For the case of the Width equaling 0, we do not draw the line.
When the Width is greater than 0, we loop through from 0 to to the width of the line (minus a slight offset for the Width of the dotted line texture), incrementing by 10. Then as long as we aren't wider than the line, we draw the texture over and over again just moving it further and further to the right each time. This gives us our dashed horizontal line.
When the Width is less than 0, we still have a loop and draw the line in a similar fashion, the difference is that we have to move down through the loop and moving the image further and further tot he left as we draw it.
Now that we have created our method to draw the Horizontal line, we need to add a call to this method to our Draw method (and remove our code we were using to draw the image where we clicked).
Add the following code to the Draw method:
protected override void Draw(GameTime gameTime)
{ graphics.GraphicsDevice.Clear(Color.Black);
// TODO: Add your drawing code here
//Begin drawing with the batch
mSpriteBatch.Begin();
//Draw the horizontal portions of the selection box
DrawHorizontalLine(mSelectionBox.Y);
//End the drawing with the batch
mSpriteBatch.End();
base.Draw(gameTime);
}
So we removed our old code from the Draw method (although we still are clearing the screen to Black) and added our call to DrawHorizontalLine. We want the horizontal line to draw the vertical position where the player initialize clicked the left mouse button, so that's why we pass in the value mSelectionBox.Y.
Well, again, we have done a lot and written quite a bit of new code. Let's take a little break from typing and do a quick build to make sure that everything compiles ok.
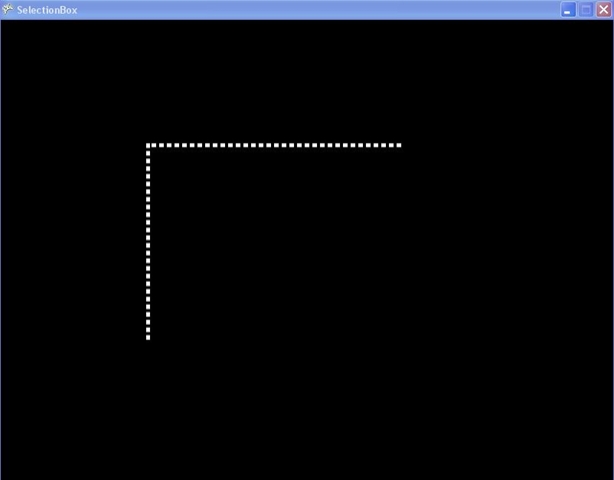
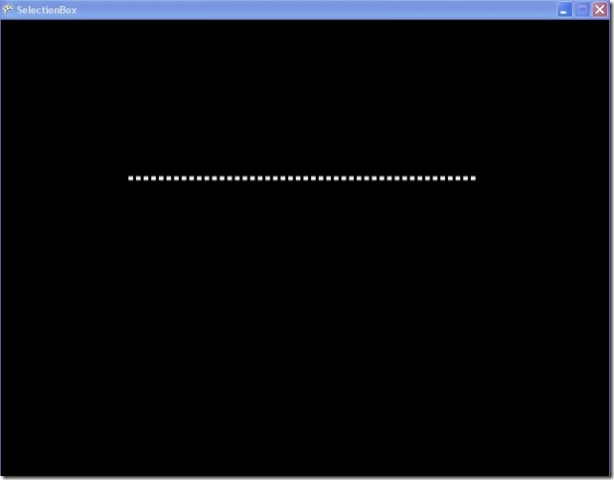
When you run the game, you should see the black screen initially. Now when you left click, the horizontal line should begin drawing and continue to draw in the horizontal direction as you move your mouse around. Releasing the Left mouse button should remove the horizontal line.
We're getting there!
Drawing a Vertical line:
To draw our vertical line, we need to track where the Mouse is moving to in the vertical direction as the player keeps the left mouse button pressed. This will require us to add some more code to the Update method.
Add the following code to the Update method:
protected override void Update(GameTime gameTime)
{ // Allows the default game to exit on Xbox 360 and Windows
if (GamePad.GetState(PlayerIndex.One).Buttons.Back == ButtonState.Pressed)
this.Exit();
// TODO: Add your update logic here
//Get the current state of the Mouse
MouseState aMouse = Mouse.GetState();
//If the user has just clicked the Left mouse button, then set the start location for the Selection box
if (aMouse.LeftButton == ButtonState.Pressed && mPreviousMouseState.LeftButton == ButtonState.Released)
{ //Set the starting location for the selection box to the current location
//where the Left button was initially clicked.
mSelectionBox = new Rectangle(aMouse.X, aMouse.Y, 0, 0);
}
//If the user is still holding the Left button down, then continue to re-size the
//selection square based on where the mouse has currently been moved to.
if (aMouse.LeftButton == ButtonState.Pressed)
{ //The starting location for the selection box remains the same, but increase (or decrease)
//the size of the Width and Height but taking the current location of the mouse minus the
//original starting location.
mSelectionBox = new Rectangle(mSelectionBox.X, mSelectionBox.Y, aMouse.X - mSelectionBox.X, aMouse.Y - mSelectionBox.Y);
}
//If the user has released the left mouse button, then reset the selection square
if (aMouse.LeftButton == ButtonState.Released)
{ //Reset the selection square to no position with no height and width
mSelectionBox = new Rectangle(-1, -1, 0, 0);
}
//Store the previous mouse state
mPreviousMouseState = aMouse;
base.Update(gameTime);
}
There was only one small change to this method. We now change the height of the selection box while the player keeps the left button clicked. We do this by taking the current Y position of the mouse and subtracting the starting Y position from it. This gives us our Height for the Vertical line.
Now we need to add a new method to the class for drawing a Vertical line. This method is fairly similar to the Horizontal method.
Add the following method to the class:
private void DrawVerticalLine(int thePositionX)
{ //When the height is greater than 0, the user is selecting an area below the starting point
if (mSelectionBox.Height > 0)
{ //Draw the line starting at the starting location and moving down
for (int aCounter = -2; aCounter <= mSelectionBox.Height; aCounter += 10)
{ if (mSelectionBox.Height - aCounter >= 0)
{ mSpriteBatch.Draw(mDottedLine, new Rectangle(thePositionX, mSelectionBox.Y + aCounter, 10, 5),
new Rectangle(0, 0, mDottedLine.Width, mDottedLine.Height), Color.White, MathHelper.ToRadians(90), new Vector2(0, 0), SpriteEffects.None, 0);
}
}
}
//When the height is less than 0, the user is selecting an area above the starting point
else if (mSelectionBox.Height < 0)
{ //Draw the line starting at the start location and moving up
for (int aCounter = 0; aCounter >= mSelectionBox.Height; aCounter -= 10)
{ if (mSelectionBox.Height - aCounter <= 0)
{ mSpriteBatch.Draw(mDottedLine, new Rectangle(thePositionX - 10, mSelectionBox.Y + aCounter, 10, 5), Color.White);
}
}
}
}
Again, we have two cases. When the Height of the vertical line is greater than zero, the player has moved the mouse pointer from the start position (where they initially left clicked) and to the bottom of the screen. This gives the vertical line a positive height. The second case is when the player has move the mouse pointer from the start position and to the top of the screen. this will give the Height a negative value. Each of those cases need to be handled separately. For the case of the Height equaling 0, we do not draw the line.
When the Height is greater than 0, we loop through from -2 (a slight offset for improving the visual look) to to the height of the line, incrementing by 10. Then as long as we aren't higher than the line, we draw the texture over and over again just moving it further and further to the down each time. When we do the actual draw call, we have to rotate the dash so that it's in the vertical position. We do this by giving it a rotation of 90 degrees. This gives us our dashed vertical line.
When the Height is less than 0, we still have a loop and draw the line in a similar fashion, the difference is that we have to move down through the loop and moving the image further and further to the top as we draw it.
Now that we have created our method to draw the Vertical line, we need to add a call to this method to our Draw method.
Add the following code to the Draw method:
protected override void Draw(GameTime gameTime)
{ graphics.GraphicsDevice.Clear(Color.Black);
// TODO: Add your drawing code here
//Begin drawing with the batch
mSpriteBatch.Begin();
//Draw the horizontal portions of the selection box
DrawHorizontalLine(mSelectionBox.Y);
//Draw the vertical portions of the selection box
DrawVerticalLine(mSelectionBox.X);
//End the drawing with the batch
mSpriteBatch.End();
base.Draw(gameTime);
}
Now that we have added our call to DrawVerticalLine (and we passed in mSelectionBox.X to draw the line at the starting X location), let again check to make sure we have the vertical line drawing correctly. Do a quick build to test things out.
When you run the game, you should see the black screen initially. Now when you left click, the horizontal line should begin drawing and continue to draw in the horizontal direction as you move your mouse around. Also, there should now be a vertical line drawing and continuing to draw in the vertical direction as you mouse your mouse around. Releasing the Left mouse button should remove the horizontal and vertical lines.

Drawing the Selection Box:
Well, we have a horizontal line and a vertical line drawing now. We only need two more lines and we will have created our selection box! To get your selection box drawing in it's entirety, you just need to add a couple more lines of code to the Draw method.
Add the following code to the Draw method:
protected override void Draw(GameTime gameTime)
{ graphics.GraphicsDevice.Clear(Color.Black);
// TODO: Add your drawing code here
//Begin drawing with the batch
mSpriteBatch.Begin();
//Draw the horizontal portions of the selection box
DrawHorizontalLine(mSelectionBox.Y);
DrawHorizontalLine(mSelectionBox.Y + mSelectionBox.Height);
//Draw the vertical portions of the selection box
DrawVerticalLine(mSelectionBox.X);
DrawVerticalLine(mSelectionBox.X + mSelectionBox.Width);
//End the drawing with the batch
mSpriteBatch.End();
base.Draw(gameTime);
}
Two new method calls have been added. We call DrawHorizontalLine a second time, passing it a new Y position (the starting Y position + the current Height of the line) to draw the bottom of the selection box. Then we call DrawVerticalLine a second time, passing it a new X position (the starting X position + the current Width of the line). This will complete the sides of our selection box.
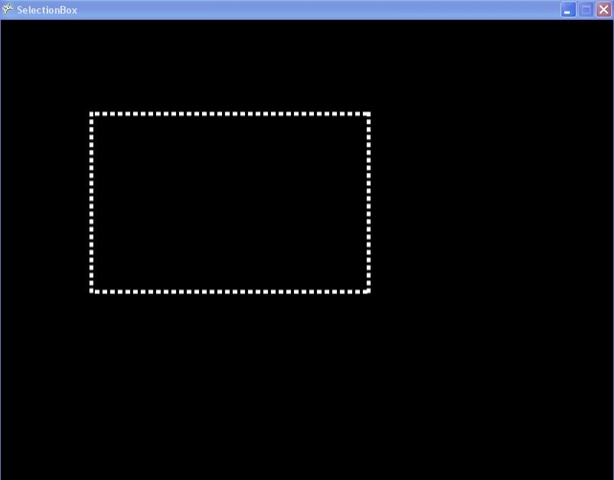
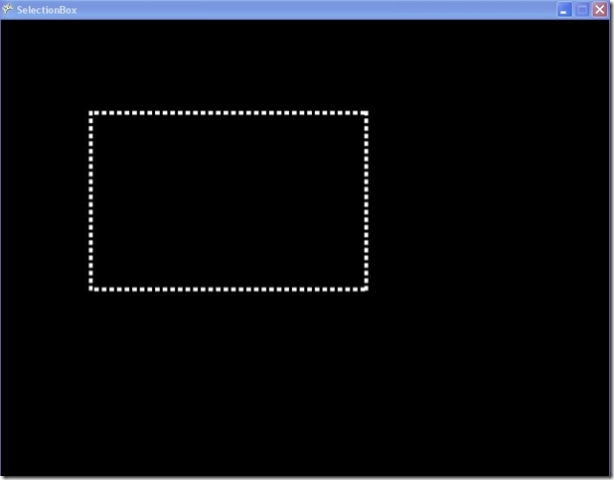
Go ahead and give the project a final build. You should now see your selection box demo working entirely. When you left click and drag, a dashed selection box will draw and when you release the left mouse button, the box will disappear.
Congratulations! You have completed the selection box tutorial.
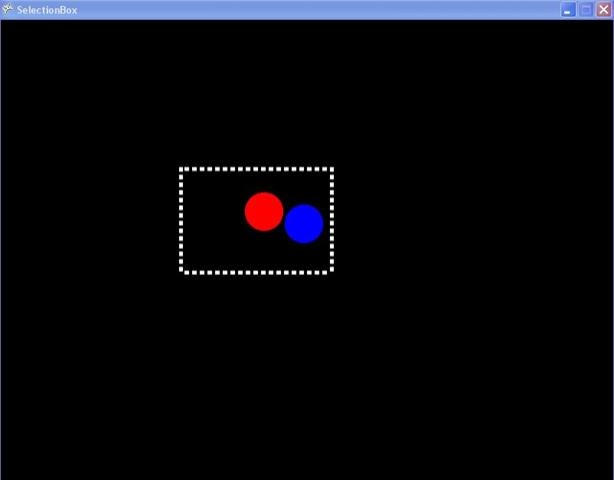
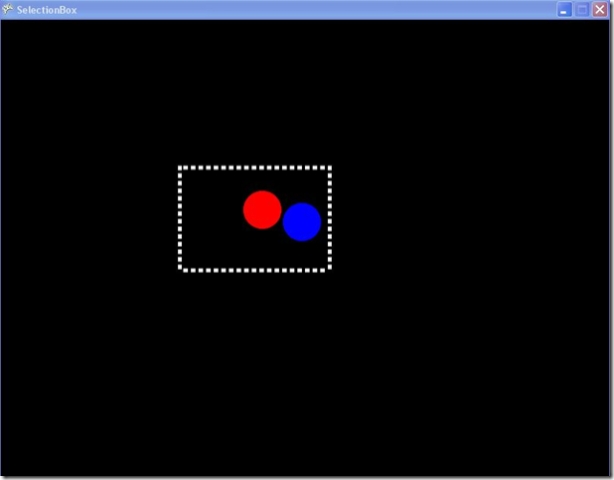
Now that you know how to create a selection box, can you think of some places where you might use it? Making an RTS (real time strategy) game is an obvious first thought but a pretty large project, can you think of a smaller game you could make using a selection box?
You can download the source code for the tutorial from here.
One Step Further:
I've expanded the project a bit creating some "units" that you can select and move around the game window just to make it a little more fun. You can download the source code for that project here.
Now take what you know and make something with it, most of all make sure that you are having fun!