


The Road Not Taken
An XNA tutorial on using a Color Key for Path Collisions
Telling a sprite where it can and cannot travel in a game is always a very crucial aspect of game development. If a character can walk through walls and move anywhere on the board, a lot of the challenge of a game disappears. There are several methods for creating paths in a game, some use tile based systems, some use bounding boxes and rectangles. The method we are going to go over today uses a Color key to define the allowed path.
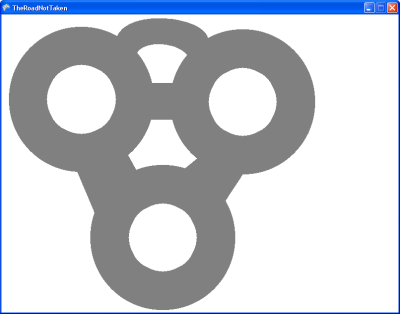
What is a color key? In this tutorial, what we are referring to as a color key is an image with a solid color on it that defines our walkable path. For "The Road Not Taken", the path is defined as all the "gray" areas. If the sprite is moving to a location that does not contain gray, then they are leaving the path and will not be allowed to move into those areas.
What this gives us, is a very simple way of making new levels by simply opening up any simple paint application and drawing a new design. The newly drawn gray areas are new paths and simply dropping the image into the game with no other changes adds a new "level" to the game.
Still not sure exactly what this color key is all about? Well, let's get started then. Sometimes a picture is worth a thousand words.
Creating the new game project:
First, let's start by opening XNA Game Studio Express and creating a new Windows Game project called "TheRoadNotTaken". If you are having trouble remembering how to create a new XNA Windows Game project just follow the steps in this tutorial here and come back to the "The Road Not Taken" tutorial after you've refreshed your memory.
Adding the images:
Now, let's add the images that we are going to be using in this tutorial to the game project. You can download the images used in the project from here. If you are having trouble remembering how to add images to an XNA Game project, just follow the steps in this tutorial here and come back to the "The Road Not Taken" tutorial after you've refreshed your memory.
Resizing the Game Window:
The images we are going to use are 800x600, so let's resize the game window so that they fill the entire window. Change the Initialize() method to look like the code sample below.
protected override void Initialize()
{
//Change the resolution to 800x600
graphics.PreferredBackBufferWidth = 800;
graphics.PreferredBackBufferHeight = 600;
graphics.ApplyChanges();
base.Initialize();
}
The code above, sets the properties of the GraphicsDeviceManager objects (graphics) that tell the display what size we would like it to be. Not all video cards support all display modes, so this will only be set if it's a valid resolution the card can handle. Let's do a quick build ![]() of the game now just to make sure the game window is resized properly and everything is correct up to this point.
of the game now just to make sure the game window is resized properly and everything is correct up to this point.
Draw the Track Color Key:
Next, let's draw the Color Key track to the screen. That's the image called "Track.png". To start, add the following class level objects to the top of the Game1.cs class.
SpriteBatch mSpriteBatch;
Texture2D mTrack;
This creates the SpriteBatch object we will be using for drawing to the screen and creates the Texture2D object we will be loading the Track color key image into.
Now, let's initialize those objects. Modify the LoadGraphicsContent() method to look like the following block of code.
protected override void LoadGraphicsContent(bool loadAllContent)
{
if (loadAllContent)
{
//Create the SpriteBatch used for drawing the Sprites
mSpriteBatch = new SpriteBatch(graphics.GraphicsDevice);
//Load the images from computer into the Texture2D objects
mTrack = content.Load<Texture2D>("Track");
}
}
With the objects created, we can go ahead and draw them to the screen. Modify the Draw() method to look like the following block of code.
protected override void Draw(GameTime gameTime)
{
graphics.GraphicsDevice.Clear(Color.CornflowerBlue);
mSpriteBatch.Begin();
mSpriteBatch.Draw(mTrack, new Rectangle(0, 0, mTrack.Width, mTrack.Height), Color.White);
mSpriteBatch.End();
base.Draw(gameTime);
}
So, we begin drawing our images with the Begin() call. Then we draw our Track color key image, positioning it at the top left of the screen and drawing the entire height and width of the image. Then we tell the batch object we are done drawing images with the End() call.
Go ahead and do another build ![]() now. You should see a very plain track displayed in our 800x600 game window. Looks like this track is just begging for a car to race around it. Let's see what we can do about making that happen.
now. You should see a very plain track displayed in our 800x600 game window. Looks like this track is just begging for a car to race around it. Let's see what we can do about making that happen.
Drawing The Car:
To draw the Car on the track, first add the following code to the top of the Game1.cs class.
Texture2D mCar;
This provides the Texture2D object to load the Car.png image into for our game to use. To load the image, add the following line of code to the LoadGraphicsContent() method. This code will be placed directly below the code that is loading our Track.png into the mTrack Texture2D object.
mCar = content.Load<Texture2D>("Car");
Now that the Content Pipeline has loaded our image, we can go ahead and draw our car to the screen. Change Draw() method to look like the following block of code.
protected override void Draw(GameTime gameTime)
{
graphics.GraphicsDevice.Clear(Color.CornflowerBlue);
mSpriteBatch.Begin();
mSpriteBatch.Draw(mTrack, new Rectangle(0, 0, mTrack.Width, mTrack.Height), Color.White);
mSpriteBatch.Draw(mCar, new Rectangle(0, 0, mCar.Width, mCar.Height), Color.White);
mSpriteBatch.End();
base.Draw(gameTime);
}
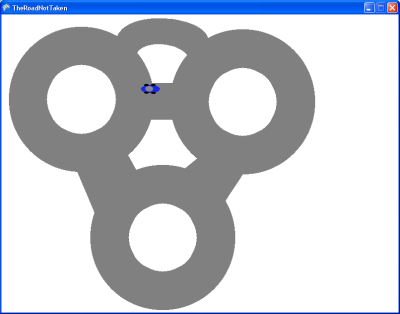
You can see that we have added a new Draw line that tells the SpriteBatch that now we want to draw the Car on top of the track. Remember, the order we write the Draw lines in matters. The track will be drawn first, then the car on top of the track.
Do another build ![]() now and we will see if this car is ready to race.
now and we will see if this car is ready to race.

Not quite huh? Time to do some positioning and scaling for the car.
Car Positioning, Scaling, Rotation, Height and Width:
To setup some of the extra metadata about the car for its position, current rotation, how to scale it and what its adjusted height and width (since we are scaling it) are, we need to add the following code to the top of the Game1.cs class.
Vector2 mCarPosition = new Vector2(300, 150);
int mCarHeight;
int mCarWidth;
float mCarRotation = 0;
double mCarScale = .2;
Now in the LoadGraphicsContent() method. Modify the method to now include setting the scaled Height and Width objects for the car. Modify the LoadGraphicsContent() method to look like the code block below.
protected override void LoadGraphicsContent(bool loadAllContent)
{
if (loadAllContent)
{
//Create the SpriteBatch used for drawing the Sprites
mSpriteBatch = new SpriteBatch(graphics.GraphicsDevice);
//Load the images from computer into the Texture2D objects
mTrack = content.Load<Texture2D>("Track");
mCar = content.Load<Texture2D>("Car");
//Scale the height and width of the car appropriately
mCarWidth = (int)(mCar.Width * mCarScale);
mCarHeight = (int)(mCar.Height * mCarScale);
}
}
We keep the scaled Height and Width for the car so we know how big the car is in the game and not just how big the original Car image was. Now, using our new information about the car with it's new position and scale. Let's try drawing it again and see if we get some better results.
Change the Draw() method to look like the following block of code. You can see that the line where we draw the car has changed to include the scale and position of the car.
protected override void Draw(GameTime gameTime)
{
graphics.GraphicsDevice.Clear(Color.CornflowerBlue);
mSpriteBatch.Begin();
mSpriteBatch.Draw(mTrack, new Rectangle(0, 0, mTrack.Width, mTrack.Height), Color.White);
mSpriteBatch.Draw(mCar, new Rectangle((int)mCarPosition.X, (int)mCarPosition.Y, mCarWidth, mCarHeight),
new Rectangle(0, 0, mCar.Width, mCar.Height), Color.White, mCarRotation,
new Vector2(mCar.Width / 2, mCar.Height / 2), SpriteEffects.None, 0);
mSpriteBatch.End();
base.Draw(gameTime);
}
Do another quick build ![]() now and make sure we have the car scaled and positioned correctly.
now and make sure we have the car scaled and positioned correctly.
That looks like a car that's ready to burn some rubber around the track. Now we just need to start accepting some input from the user and making that little car zoom!
Making it Move:
To make our car move, we're going to need to add some code to the Update() method to check for what input is coming in from the keyboard and XBox 360 controller and react accordingly. Modify the Update() method to look like the following block of code.
protected override void Update(GameTime gameTime)
{
GamePadState aGamePad = GamePad.GetState(PlayerIndex.One);
KeyboardState aKeyboard = Keyboard.GetState();
//Check to see if the game should be exited
if (aGamePad.Buttons.Back == ButtonState.Pressed || aKeyboard.IsKeyDown(Keys.Escape) == true)
{
this.Exit();
}
//Rotate the Car sprite with the Left Thumbstick or the up and down arrows
mCarRotation += (float)(aGamePad.ThumbSticks.Left.X * 3.0f * gameTime.ElapsedGameTime.TotalSeconds);
if (aKeyboard.IsKeyDown(Keys.Up) == true || aKeyboard.IsKeyDown(Keys.Left) == true)
{
mCarRotation -= (float)(1 * 3.0f * gameTime.ElapsedGameTime.TotalSeconds);
}
else if (aKeyboard.IsKeyDown(Keys.Down) == true || aKeyboard.IsKeyDown(Keys.Right) == true)
{
mCarRotation += (float)(1 * 3.0f * gameTime.ElapsedGameTime.TotalSeconds);
}
//Setup the Movement increment.
int aMove = (int)(200 * gameTime.ElapsedGameTime.TotalSeconds);
//Move the sprite
mCarPosition.X += (float)(aMove * Math.Cos(mCarRotation));
mCarPosition.Y += (float)(aMove * Math.Sin(mCarRotation));
base.Update(gameTime);
}
Starting at the top of the Update() method, we first get the current state of player one's gamepad and of the keyboard. Next, we do a quick check to see if the player wants to exit the game. In this code, we're looking to see if they pressed the Back button on the gamepad or the Escape key on the keyboard. If they did, then we exit the game.
Next up, we work on rotating the car. Rotation with the Thumbstick on the gamepad is easy. We just increment the Rotation object (mRotation) by the amount of rotation on the left thumbstick using a multiplier and time to give us time based rotation.
Rotating the car with the arrow keys is similar, just takes a bit more code. We still do time based rotation for the keys, we just change the rotation direction manually depending on what arrow keys are being pressed.
Next, we create a movement amount. We want to move the car a certain distance, but we want that to be fairly consistent no matter how fast someone's computer might be so we use time to give us a time based movement amount.
Now, we move the sprite. We want the sprite to move in the direction of the rotation and that's where the Math functions come in handy. By multiplying the movement amount times the Cos for the X and Sin for the Y of the current rotation, we can move the car in direction of the rotation. Pretty handy and you will use that quite a bit in future projects so file that away.
So we have rotation and movement, let's do a build ![]() now to make sure we haven't introduced any compiler errors and see how the car handles the road. When you run the game, you should be able to steer the car (it moves automatically in the direction it is pointed) with either the left thumbstick on the 360 controller or with the arrow keys on the keyboard.
now to make sure we haven't introduced any compiler errors and see how the car handles the road. When you run the game, you should be able to steer the car (it moves automatically in the direction it is pointed) with either the left thumbstick on the 360 controller or with the arrow keys on the keyboard.
Runs like a charm, but unfortunately, does not seem to care whether it is driving on the road or not. Now comes the meat and potatoes of this whole tutorial. Let's make this car aware of the path.
Path Collision:
The challenge we have now is to try and make the car realize where it's ok to drive and where it is not allowed to go. We want to try and do this in such a way, that we could just swap out our current image for the Track color key (Track.png) and modify it with a new track and the game should still work with no code changes. To do that, what we are going to do, is attempt to detect what pixel colors are beneath the car image and always make sure those pixels are the grey road color we used for our color key.
The logic is going to work like this.
1. In the Update() method, calculate how far the care was going to move in the X and Y directions.
2. Take a sample from the color key of a square patch of that area. Basically, pretend the car is sitting there on the color key. Then draw a square around where the car would be (if it had moved there) in the Track color key and make that an image.
3. The XNA framework has a method called GetData(). This method will return information about a rectangular block of pixels for you from a texture. The issue we have is that area must always be rectangular, but we have a rectangular car that rotates. That's where this step three comes into play. Since we can't send a rotated rectangle to the GetData() method, we rotate the square sample texture we made in step two around the car using the car's current rotation. This gives us the picture we wanted and we make an image of that.
4. Use GetData() on the image made in step 3, pass in a rectangular area the size of our car and get the Color of all of the pixels in that area. This would be the rectangular area under the car, if the car had moved.
5. Loop through all of the Colors returned by GetData(). If any of the pixels is NOT gray, then the car is going to move off the track. Indicate a collision would have occurred and do not allow the car to move. If all of the pixels ARE gray, then apply the movement to the current position of the car, making it move.
To start coding, we are going to need to add two new object types to our game. We are going to be creating "screenshots" of a sort in the game and to achieve that we will be using an XNA framwork object called "RenderTarget2D". Add the following lines of code to the top of the Game1.cs class.
RenderTarget2D mTrackRender;
RenderTarget2D mTrackRenderRotated;
These render targets will be used to help make the images described in steps two in three in the logic explanation above.
Now that we have our render target object, we need to initialize them. Add the following lines of code to the LoadGraphicsContent() method. They should follow directly after the loading of all of our textures and where we define the car's scaled down height and width.
//Setup the render targets to be used in determining if the car is on the track
mTrackRender = new RenderTarget2D(graphics.GraphicsDevice, mCarWidth + 100,
mCarHeight + 100, 1, SurfaceFormat.Color);
mTrackRenderRotated = new RenderTarget2D(graphics.GraphicsDevice, mCarWidth + 100,
mCarHeight + 100, 1, SurfaceFormat.Color);
Render targets are a way of drawing thing internally in code that you are not quite ready to draw to the screen. Often they are used to combine images together before you do rotations. Think about an image that has several moving parts that are drawn together. Rather than rotating each piece individually, you might combine them all by drawing them to a render target, then generating a texture in code that you can rotate.
We are setting up our render targets to use our Graphics device and saying how big they are. We don't need very large render targets, they are just going to hold a square area around the car, so we will just make them slightly larger than the scaled down car's height and width. The next two parameters indicate the mip levels and format to be used with the render target. You can try experimenting with these later, but for most 2D games you are going to be using 1 and SurfaceFormat.Color in most cases. Still good to read up on what other tricks you might be able to pull by changing these values.
Next, we are going to need to modify the Update() method. Before we actually move the car, we need to do a check first to see if a collision has occurred or not. Modify the Update() method to now have the IF..THEN block wrapping the lines of code where we applied the movement to the position of the car.
//Check to see if a collision occured. If a collision didn't occur, then move the sprite
if (CollisionOccurred(aMove) == false)
{
mCarPosition.X += (float)(aMove * Math.Cos(mCarRotation));
mCarPosition.Y += (float)(aMove * Math.Sin(mCarRotation));
}
We are calling a new method here called "CollisionOccurred" that does not exist yet. We need to create it. This method is going to determine if a collision would occur if the car moved the distance passed into the method.
Add the following CollisionOcurred() method to the Game1.cs class.
//This method checks to see if the Sprite is going to move into an area that does
//not contain all Gray pixels. If the move amount would cause a movement into a non-gray
//pixel, then a collision has occurred.
private bool CollisionOccurred(int aMove)
{
//Calculate the Position of the Car and create the collision Texture. This texture will contain
//all of the pixels that are directly underneath the sprite currently on the Track image.
float aXPosition = (float)(-mCarWidth / 2 + mCarPosition.X + aMove * Math.Cos(mCarRotation));
float aYPosition = (float)(-mCarHeight / 2 + mCarPosition.Y + aMove * Math.Sin(mCarRotation));
Texture2D aCollisionCheck = CreateCollisionTexture(aXPosition, aYPosition);
//Use GetData to fill in an array with all of the Colors of the Pixels in the area of the Collision Texture
int aPixels = mCarWidth * mCarHeight;
Color[] myColors = new Color[aPixels];
aCollisionCheck.GetData<Color>(0, new Rectangle((int)(aCollisionCheck.Width / 2 - mCarWidth / 2),
(int)(aCollisionCheck.Height / 2 - mCarHeight / 2), mCarWidth, mCarHeight), myColors, 0, aPixels);
//Cycle through all of the colors in the Array and see if any of them
//are not Gray. If one of them isn't Gray, then the Car is heading off the road
//and a Collision has occurred
bool aCollision = false;
foreach (Color aColor in myColors)
{
//If one of the pixels in that area is not Gray, then the sprite is moving
//off the allowed movement area
if (aColor != Color.Gray)
{
aCollision = true;
break;
}
}
return aCollision;
}
There's a lot going on there so we can walk through the method slowly. First, we need to figure out where the car would be moving to, if it moved the distance passed into the CollisionOccurred() method. So we apply aMove and obtain the X and Y coordinates of where the car would be.
Next, we create a new texture. This texture is the rotated square area of the track around where the car would be moving to. We don't currently have the "CreateCollisionTexture" method yet, but that will return that texture for us.
Now that we have the texture image from the color key of where the car would be moving, we gather the color information of the pixels of where the car would be sitting in that image. We do that but filling an array of colors using the GetData() method. By passing in a rectangle to represent the area the car would be taking up, we can obtain information about all of the pixels that would be directly beneath the car if it moved to that location.
With the color information collected, we now start looping through all of the colors returned for the rectangular area of the car. If a color is not Gray (our designated path color for this sample), then the car would be moving off the track. Indicate a collision would be occurring and stop looping.
Finally, we return whether the car would be colliding or not, which basically means whether there would be any non-gray pixels underneath the car if it moved to that new location. True if there was a non-gray pixel, false if they were all gray beneath the car.
So we have our function to determine collisions, but it relies on a method "CreateCollisionTexture" which we still need to create. Add the following block of code to the Game1.cs class to add the CreateCollisionTexture() method to the game.
//Create the Collision Texture that contains the rotated Track image for determing
//the pixels beneath the Car srite.
private Texture2D CreateCollisionTexture(float theXPosition, float theYPosition)
{
//Grab a square of the Track image that is around the Car
graphics.GraphicsDevice.SetRenderTarget(0, mTrackRender);
graphics.GraphicsDevice.Clear(ClearOptions.Target, Color.Red, 0, 0);
mSpriteBatch.Begin();
mSpriteBatch.Draw(mTrack, new Rectangle(0, 0, mCarWidth + 100, mCarHeight + 100),
new Rectangle((int)(theXPosition - 50),
(int)(theYPosition - 50), mCarWidth + 100, mCarHeight + 100), Color.White);
mSpriteBatch.End();
graphics.GraphicsDevice.ResolveRenderTarget(0);
graphics.GraphicsDevice.SetRenderTarget(0, null);
Texture2D aPicture = mTrackRender.GetTexture();
//Rotate the snapshot of the area Around the car sprite and return that
graphics.GraphicsDevice.SetRenderTarget(0, mTrackRenderRotated);
graphics.GraphicsDevice.Clear(ClearOptions.Target, Color.Red, 0, 0);
mSpriteBatch.Begin();
mSpriteBatch.Draw(aPicture, new Rectangle((int)(aPicture.Width / 2), (int)(aPicture.Height / 2),
aPicture.Width, aPicture.Height), new Rectangle(0, 0, aPicture.Width, aPicture.Width),
Color.White, -mCarRotation, new Vector2((int)(aPicture.Width / 2), (int)(aPicture.Height / 2)),
SpriteEffects.None, 0);
mSpriteBatch.End();
graphics.GraphicsDevice.ResolveRenderTarget(0);
graphics.GraphicsDevice.SetRenderTarget(0, null);
return mTrackRenderRotated.GetTexture();
}
Phew. That one is a doozy. But it's not as scary as it seems. Again, we'll take it from the top and walk through it slowly explaining what is going on. The first thing that happens is we talk to our graphics device and say, hey, I don't want you to draw to the screen, I want to draw on this render target "mTrackRender" instead ok? It of course agrees because it's a good little graphics device.
Next, we clear the render target, this should start to look familiar. The code we write to draw to a render target is very similar to the code we write in the Draw() method.
Now, we begin drawing using our SpriteBatch. The only difference is when the batch starts drawing, it won't be drawing the sprites to the screen, but will instead be drawing them on our render target object. We want to draw the square area around the car (or more correctly, the area around the car would be if it is allowed to move there). So that's what we do here, we draw the part of our color key where the car would be to our render target.
So after we close the batch, letting it know we are done drawing, we need to tell the graphics device that we are ready for it to put everything on our render target. "ResolveRenderTarget" is the method that does that for us. Now our "mTrackRender" object has our image drawn on it. "SetRenderTarget" is now called just to flush out the graphics device so it no longer is using our render target to draw on.
Ok, so now we have the area of track where the car would be moving too, but we still need to compensate for our rotation. Well, we can take care of that rotating our image. The only issue is that we don't have a Texture2D to rotate, we only have a render target. Well, luckily, the XNA framework has given a handy method for RenderTarget2D called GetTexture() which will create a Texture2D object of the current scene on the render target.
Now that we have a Texture2D object of our square sample of the color key. We need to rotate it. So, we begin setting up the graphics device again. This time we're going to render on our mTrackRenderRotated render target.
We clear that render target to red and begin drawing. Now, when we draw the track, we are drawing the Texture2D we created in code and we rotate that according to the current rotation of the car.
Again, we draw our scene and let the graphics device know we don't want it to draw on our render target anymore. Now we have a render target that contains the square sample of the color key track where the car would be and it is rotated properly.
Finally, we return the texture generate by that render target. The CollisionOccured() method we wrote above then does it's GetData() magic and checks to see what colors the pixels are in that returned texture.
Do a build ![]() now and see how it behaves. The car should now drive around the track and will not allow you to steer it through any walls.
now and see how it behaves. The car should now drive around the track and will not allow you to steer it through any walls.

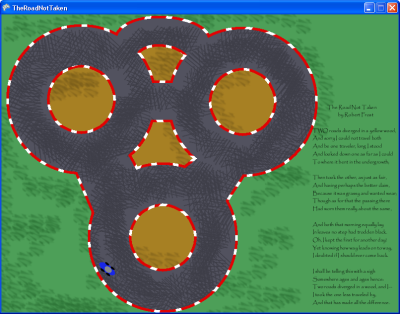
Well, we have it working. You could at this point, open the track image up in your favorite image editing program and modify it or re-do it all. You could define new paths just by painting with a gray brush. With your newly created track, the car would behave the same. It would only be allowed to drive on the gray pixels. Pretty slick right?
We're not quite done though. The last step in this whole process to really show the power of the path color key is to add our overlay image. The power of the color key is that with it, you can make a fancy schmancy image to use as your display, but the simplistic paths in your image are stored in the color key. The player has no idea that the real paths are contained in the color key.
Adding the Overlay:
To draw the track overlay, we are going to need a new Texture2D object to load in our image and draw it to the screen. Add the following code to the top of the Game1.cs class.
Texture2D mTrackOverlay;
Next, we need to load our overlay image into our Texture2D object. Add the following code to the LoadGraphicsContent() method. It should be placed in the same location that all of the other Texture2D objects for our game have been added.
mTrackOverlay = content.Load<Texture2D>("TrackOverlay");
Now we need to modify the Draw() method. We no longer need to draw the Track color key. It's ugly and it's entire purpose is just for the code to use it to determine where it's safe to drive and where it isn't. Instead, we now want to draw our overlay image. So modify the Draw() method to look like the following block of code with the Track no longer being drawn and the TrackOverlay being drawn instead.
protected override void Draw(GameTime gameTime)
{
graphics.GraphicsDevice.Clear(Color.CornflowerBlue);
mSpriteBatch.Begin();
mSpriteBatch.Draw(mTrackOverlay, new Rectangle(0, 0, mTrackOverlay.Width, mTrackOverlay.Height), Color.White);
mSpriteBatch.Draw(mCar, new Rectangle((int)mCarPosition.X, (int)mCarPosition.Y, mCarWidth, mCarHeight),
new Rectangle(0, 0, mCar.Width, mCar.Height), Color.White, mCarRotation,
new Vector2(mCar.Width / 2, mCar.Height / 2), SpriteEffects.None, 0);
mSpriteBatch.End();
base.Draw(gameTime);
}
Now do a final build ![]() of the game now. You should see the much nicer looking track overlay and the path collision should still be working correctly off the track color key that the player never sees.
of the game now. You should see the much nicer looking track overlay and the path collision should still be working correctly off the track color key that the player never sees.
Congratulations!
You have completed the color key path collision tutorial. Now that you know the basics of using a color key to do path collision, can you think of some other ways you could us it? Could you make a dungeon crawler using it? Are there downsides to using this method? Play around, experiment a little. Try to make some new track color keys with your own track overlays. Do you know what code you'd need to change to make Black pathways?
Now take what you know and make something with it. Most of all, make sure that you are having fun!