

Fade In, Fade Out
How to fade an image into and out of a scene.In this tutorial, we will examine how to fade in image into and out of a scene. Using a technique like this can be useful when you want to fade in some text or maybe fade out some falling enemies.
Creating the new game project:
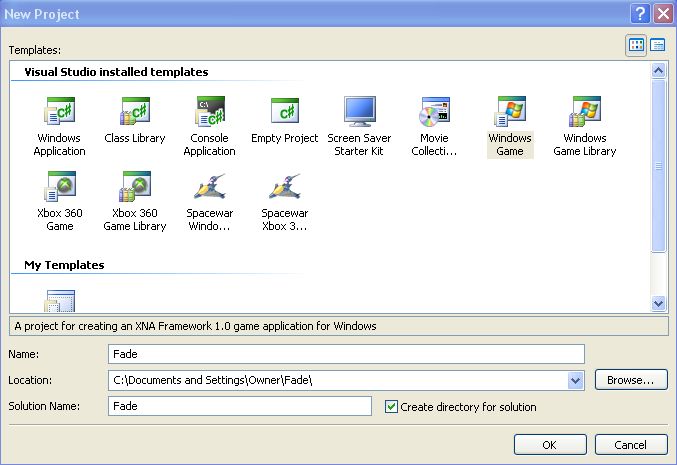
To start, first create a new Windows Game Project. This can be done by launching XNA Game Studio Express and then selecting File -> New Project from the Menu.
In the New Project window, select the "Windows Game" template and then give the project a name and choose a location to save the project.
Let's stop here and do a quick build ![]() so you can see the power of XNA (and so we can verify that the project was created correctly and that your video card supports the minimum XNA requirements).
so you can see the power of XNA (and so we can verify that the project was created correctly and that your video card supports the minimum XNA requirements).
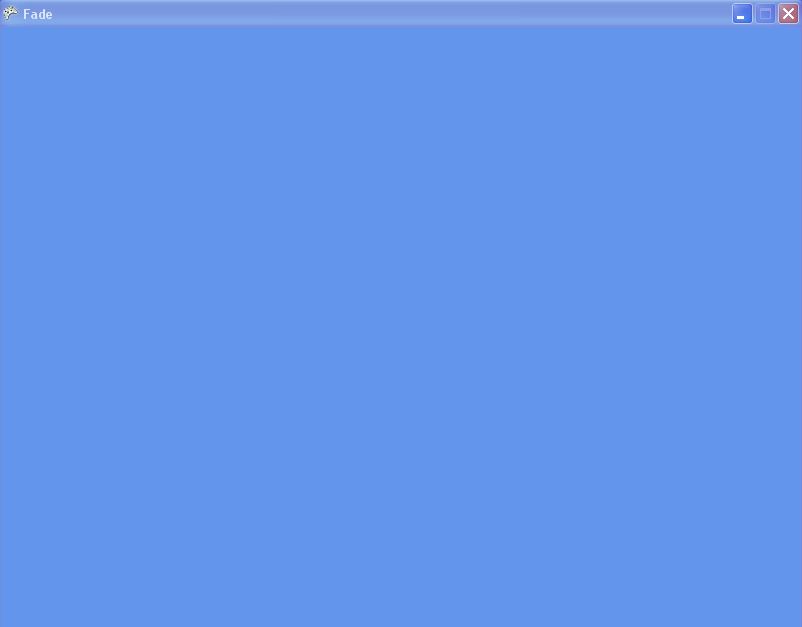
When you run the project, you should be greeted with a Cornflower blue window. If you're seeing this lovely shade of blue, then you have successfully setup your new game project.
If you have an error, then your video card most likely does not meet the minimum requirements for XNA. See the XNA FAQ from the Microsoft site for the minimum requirements and verify that your video cards meet those. If you believe your video card does meet those requirement and are still getting an error, than I recommend you pop on over to the MSDN XNA Forums and describe the error you are getting ask for some help there (you will probably see me around there, I find them a great place to hang out).
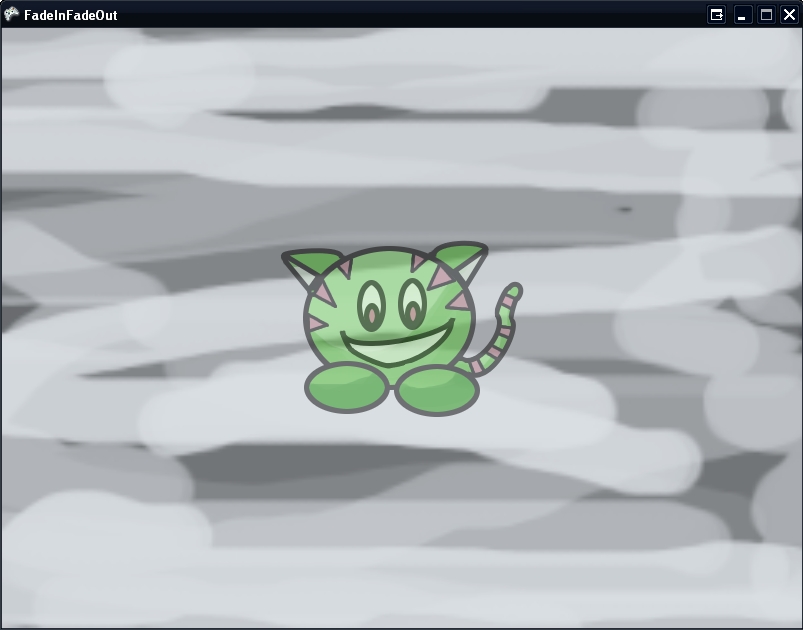
Next, let's add the image to the project that we are going to fade in this example. In this tutorial, we are going to be fading in and out a cat creature. Here's the little guy now.

You can download the image from here to use in your project or feel free to use an image of your own.
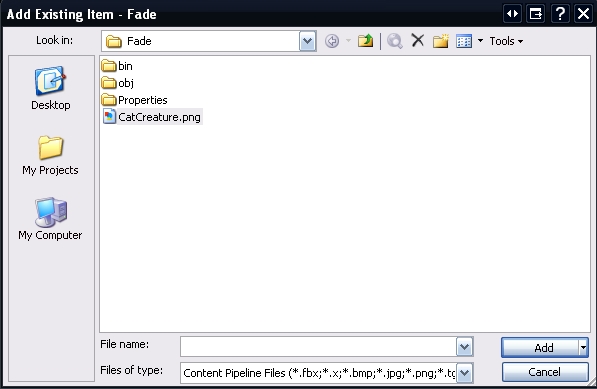
To add an image to the game project. Right-click on the project name and select "Add -> Existing Item". This will open the "Add Existing Item" dialog.
This dialog box defaults to show only Visual C# Files which mean you won't see any pictures until you change this. We want to use the Content Pipeline to manage our images so from the "Files of type:" combobox, select "Content Pipeline Files". Now you should be able to navigate to your image. Select it and click the "Add" button. You have now successfully added an image to your game project.
We have create the game project, added an image, now let's go ahead and write a little code to make that image draw on the screen.
Start by adding two new objects to the class. These objects will take care of drawing the image and storing the image.
SpriteBatch mBatch;
Texture2D mCatCreature;
This "SpriteBatch" object is used to draw your images. The "Texture2D" object is used to store your images. Both of these types of objects are used very frequently when creating 2D games with XNA, so learning to use them and all that they can do becomes very important. We will only be scratching the surface of what you can do with just these two objects in this tutorial.
Now that we our objects, we need to initialize them and use them. To initialize the objects, we are going to add some code to the "LoadGraphicsContent" method that was automatically created for us when we selected the Windows Game template.
Add the following code to the "LoadGraphicsContent" method.
protected override void LoadGraphicsContent(bool loadAllContent)
{ if (loadAllContent) { // TODO: Load any ResourceManagementMode.Automatic content //Initialize the sprite batchmBatch = new SpriteBatch(this.graphics.GraphicsDevice);
//Create the Content Manager object to load images ContentManager aLoader = new ContentManager(this.Services);
//Use the Content Manager to load the Cat Creature image into the Texture2D objectmCatCreature = aLoader.Load<Texture2D>("CatCreature") as Texture2D;
}
// TODO: Load any ResourceManagementMode.Manual content}
First, we initialized our SpriteBatch. If we had forgotten to initialize it, when we tried to use this object later, we would have gotten an error that "Object reference was not set to an instance of an object". When developing with objects, this becomes a fairly frequent error to see. Once you get it, you know that somewhere in your code you forgot to initialize an object.
Then we created a new object, a "ContentManager" object, to be used just within this method. The ContentManager object is used to load our images.
Finally, we used the newly created "ContentManager" object to load our "CatCreature" image and store it in our Texture2D object.
Now that we have initialized all of our objects, we can draw our Cat Creature to the screen. To actually draw the image to the screen, we will add some code to the "Draw" method. The "Draw" method is another one of the base methods that was automatically created for us when we made a new Windows Game project.
Add the following code to the "Draw" method.
protected override void Draw(GameTime gameTime)
{graphics.GraphicsDevice.Clear(Color.CornflowerBlue);
// TODO: Add your drawing code heremBatch.Begin();
mBatch.Draw(mCatCreature, new Rectangle(0, 0, mCatCreature.Width, mCatCreature.Height), Color.White);mBatch.End();
base.Draw(gameTime);}
First, we let the SpriteBatch object know that we are ready to begin drawing some things.
Then we draw our image using the SpriteBatch. In this case, we told the SpriteBatch which image we wanted to draw (our CatCreature Texture2D object), where we wanted to draw it, how big we wanted the image to be and what color we wanted to shade the image. We told the SpriteBatch where we wanted to draw the image and how big we wanted to make it when we passed in that Rectangle object. The first two values of the Rectangle object tell the SpriteBatch which x, y location we want to start drawing our image. In this case, we told the SpriteBatch that we wanted to draw it at the (0,0) point on the screen which is the upper left of the screen. The next two values of the Rectangle object tell the SpriteBatch how wide and how high we want the image to be. In this case we used the original size of the CatCreature image by passing in the Width and Height of our Texture2D object. Finally, the Color value we chose was White. This tells the SpriteBatch that we don't want to apply any coloring to the image at this time.
Last, we tell the SpriteBatch object that we are done drawing are images.
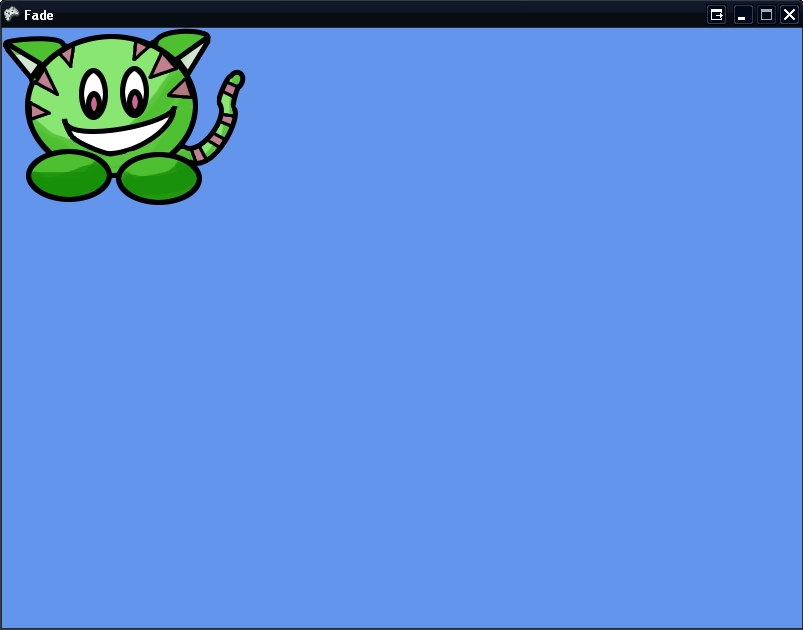
Now that we have created our objects and drawn the image to the screen, let's do a quick build ![]() to make sure that we have coded everything properly and that there are no errors.
to make sure that we have coded everything properly and that there are no errors.
When you do the build you should be presented with a screen like this one.
Fading the image in and out:
Now that we are actually drawing the image to the screen, let's enhance the code to actually fade the image in and out. (that was kind of the purpose of this tutorial in the first place right?).
To start, we are going to add some tracking objects to the class. We will add them directly below the SpriteBatch and Texture2D objects we created in the first steps.
Add the following code to the top of your class after the SpriteBatch and Texture2D object declarations.
int mAlphaValue = 1;
int mFadeIncrement = 3;
double mFadeDelay = .035;
Now, we just need to add the logic for the fading. We will add that code to the Update function. This is another one of the automatically generated functions that was created when you made a new XNA Game project.
Add the following code to the Update method:
protected override void Update(GameTime gameTime)
{ // Allows the default game to exit on Xbox 360 and Windows if (GamePad.GetState(PlayerIndex.One).Buttons.Back == ButtonState.Pressed) this.Exit(); // TODO: Add your update logic here //Decrement the delay by the number of seconds that have elapsed since //the last time that the Update method was calledmFadeDelay -= gameTime.ElapsedGameTime.TotalSeconds;
//If the Fade delays has dropped below zero, then it is time to //fade in/fade out the image a little bit more. if (mFadeDelay <= 0) { //Reset the Fade delaymFadeDelay = .035;
//Increment/Decrement the fade value for the imagemAlphaValue += mFadeIncrement;
//If the AlphaValue is equal or above the max Alpha value or //has dropped below or equal to the min Alpha value, then //reverse the fade if (mAlphaValue >= 255 || mAlphaValue <= 0) {mFadeIncrement *= -1;
}
}
base.Update(gameTime);}
This code is the meat and potatoes of the logic for fading the image in and out.
We start by decrementing the Fade delay tracking object. This object is used to control how often the object is faded. If we faded the image every time the Update function was called. The image would fade in and out too quickly for the viewer to appreciate the effect. So by only changing the fade every certain interval, the effect can be seen properly.
Next we check to see if it's time to change the Fade effect. If enough of a delay has elapsed (the delay tracking object is now less than or equal to zero), then we first reset the delay object and then Increment/Decrement the Alpha value to increase/decrease the amount of fade the image has.
Finally, we check to see if the Alpha Value has increased or decreased outside the range of accepted alpha values (colors go from 0-255). If the Alpha Value object has exceeded these values, then we will reverse the direction of the fade. We reverse the direction of the fade by taking the Increment object and multiplying it by -1.
So now we've written our fade logic. There's only one thing left to do. Change the way the image is drawn so that the fade effect is applied.
We do that by modifying the line of code that draws the image that we added to the "Draw" method previously.
So in the "Draw" method, the following line of code:
mBatch.Draw(mCatCreature, new Rectangle(0, 0, mCatCreature.Width, mCatCreature.Height), Color.White);Become this new line of code:
mBatch.Draw(mCatCreature, new Rectangle(0, 0, mCatCreature.Width, mCatCreature.Height), new Color(255, 255, 255, (byte)MathHelper.Clamp(mAlphaValue, 0, 255)));
So you will immediately notice that there are some changes to the values being passed into the Draw method of the SpriteBatch object. Particularly, the Color object has changed from the simple Color.White to this new complicated looking Color value. This is how we are achieving the fade effect on the image.
Basically, we still have a white color. That's what we create when we say New Color(255, 255, 255... Those are the Red, Blue and Green values for the color and setting each of them to 255 says we are making white. The last value is the "Alpha" value, that is the value we change from 0 to 255 and from 255 back to 0 to achieve our fade effect.
We use a little MathHelper method(MathHelper has LOTS of very useful methods) called "Clamp" to keep our AlphaValue within the accept range for Alpha Values (basically 0 to 255).
And that's all you need. Now, you can do a quick build ![]() to see the Cat Creature fade in and then fade out.
to see the Cat Creature fade in and then fade out.
Now that you know how to achieve a fade effect, can you think of some places where you might use it? Try to modify the code so the image just fades in but does not fade back out. Try to modify the code to fade out but not fade back in. Try to re-position the image so that it is drawn in a new location.
Can you think of a game you can make using just what you know?
You can download the Project for the tutorial from here. I've also expanded the project a bit making more of a "Cheshire Cat Creature" just to make it a little more fun. You can download the source code for that project here.
Now take what you know and make something with it, most of all make sure that you are having fun!