|
2D Pong using the Microsoft XNA Framework
by David Bailey
Introduction
In this tutorial, I build a simple Pong game using the new XNA Framework Beta 1. I'm assuming that whoever is following this tutorial has a basic understanding of C# and OOP, and knows how to use the Visual C# Express IDE.
Pong is a very simple game; the player controls a paddle on one side of the screen and plays against another paddle controlled by the computer. A ball is hit back and forth between these 2 paddles; a player gains a point if the other player does not manage to hit the ball.
Creating your Project
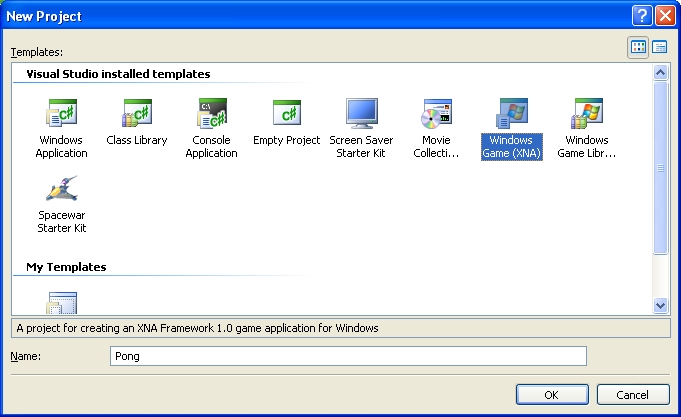
Open XNA Game Studio Express and start a new Game by going to File > New Project.. and select Windows Game (XNA). Give the project a title such as Pong and click OK:
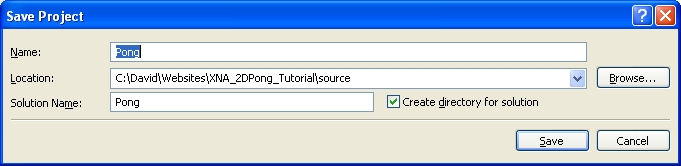
Go to File > Save All and save the whole project:
Setting up the Game
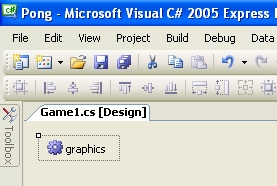
XNA Game Studio Express creates a project for us with all the required classes and methods that initiate a DirectX enabled window. The Game1.cs file creates a "game" by inheriting from the Microsoft.Xna.Framework.Game class, andcontains the Update() and Draw() methods in which we will code the game's logic and graphics. More on this later.
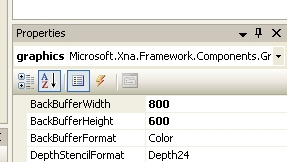
Let's now set up some basic things such as the window size of the game and any graphics we will be using. Click on the graphics component in the Game1.cs Designer window and modify the BackBufferWidth and BackBufferHeight to 800 and 600 repsectively. The game will be windowed, no full screen for now:
We now need to add any graphics that we will be using in the game to the project. I created a simple paddle and a simple ball graphic in Photoshop CS2 and saved them as .png files. The files are included with this tutorial in a folder called "textures" and you can load them into the project by right clicking on the Project name in the Solution Explorer window and going to Add > Existing Items. Browse to the folder containing the PNGs and add them to the project.
Adding the images to the project is just the first step - now we need to load them as textures so that they can be displayed on screen. Go to the Code view of the Game1.cs file and add the following declarations just before the constructor of the class:
Texture2D t_paddle1, t_paddle2, t_ball;
SpriteBatch spriteBatch;
Here we have declared three Texture2D objects, two for the paddles and one for the ball. We also need a SpriteBatch object which will be used to display my sprites (2D textures) on the screen. Now we need to create the Texture2D objects from the PNG images in our project. We will create a seperate method for this, called LoadResources(), so add the following code after the constructor of the class:
void LoadResources()
{
t_paddle1 = Texture2D.FromFile(graphics.GraphicsDevice, "../../paddle.png");
t_paddle2 = Texture2D.FromFile(graphics.GraphicsDevice, "../../paddle.png");
t_ball = Texture2D.FromFile(graphics.GraphicsDevice, "../../ball.png");
spriteBatch = new SpriteBatch(graphics.GraphicsDevice);
}
The Texture2D.FromFile method takes 2 parameters in this case: the device on which the textures will be created, and the source of the PNG files, which are located inside our project. "../../" indicates two folders up from the current folder, which is the "Debug" directory of our solution. We also create the SpriteBatch object.
Of course, coding the method and never calling it won't do much for us. Resources have to be loaded when the game starts, as well as when the graphics device is reset. Add the following code just before the LoadResources() method:
protected override void OnStarting()
{
base.OnStarting();
graphics.GraphicsDevice.DeviceReset += new EventHandler(GraphicsDevice_DeviceReset);
LoadResources();
}
void GraphicsDevice_DeviceReset(object sender, EventArgs e)
{
LoadResources();
}
In this code we override the Game.OnStarting() method and create an event handler for when the device resets. Inside each method we call the LoadResources() method so that the textures are created when the game starts and when the device resets.
Paddle and Ball Classes
In order to better manage the components inside our game, two classes will be created which will represent the paddles and the ball in the game. First we will create the Paddle class, so add a new class to the project (right click on Project name > Add > Class) and add a new class Paddle.cs. Delete all the code inside the Paddle.cs file and replace with the following code:
using System;
using System.Collections.Generic;
using System.Text;
using Microsoft.Xna.Framework;
namespace Pong
{
/// <summary>
/// Creates a paddle object
/// </summary>
class Paddle
{
//position of paddle
public Point pos;
public int speed;
//constructor - position
public Paddle(int x, int y)
{
pos = new Point(x, y);
speed = 3;
}
}
}
This class is very simple to understand: a paddle will be identified by its position (Point pos) and the speed and direction it is travelling in at the moment (int speed). The constructor of the class takes an X,Y co-ordinate which determines the initial location of the paddle. Also the default speed of the paddle is 3, which means it will move 3 pixels each time.
The Ball class is very similar, so just create a new class (Ball.cs) and paste the following code inside it:
using System;
using System.Collections.Generic;
using System.Text;
using Microsoft.Xna.Framework;
namespace Pong
{
/// <summary>
/// Creates a ball object
/// </summary>
class Ball
{
//position of ball
public Point pos;
public int h_speed, v_speed;
//constructor - position
public Ball(int x, int y)
{
pos = new Point(x, y);
Random rand = new Random();
h_speed = rand.Next(3, 7);
if (rand.Next(0, 2) == 0) h_speed *= -1;
rand = new Random();
v_speed = rand.Next(3, 7);
if (rand.Next(0, 2) == 0) v_speed *= -1;
}
}
}
The ball is also defined by its position, but it has two speeds and direction this time, the vertical and horizontal speeds. The speed for these positions is between 3 and 6, and the Random class is used to generate a random speed and direction when the ball is created. These speeds will be hardcoded in this game to keep it simple; it would be a good idea to put these values inside an XML file and make the game customizable at run-time.
Finally, we just declare two paddles and a ball in the Game1.cs file, just before the constructor.
Paddle paddle1;
Paddle paddle2;
Ball ball;
In order to create these objects, we will use a method which simply instatiates the objects and passes some default starting values to them. Create a method ResetGame() just after the constructor:
void ResetGame()
{
paddle1 = new Paddle(10, 200);
paddle2 = new Paddle(770, 200);
ball = new Ball(385, 285);
}
Also we need to call this method as soon as the game starts, so add a call to it inside the constructor:
public Game1()
{
InitializeComponent();
ResetGame();
}
Great! Our game is setup and all we have left is to draw the graphics on the screen and move them about.
Drawing Textures on Screen
Now we have to draw the textures on the screen, and the best place to do this is inside the Draw() method of the Game1.cs class. Some code already exists inside the method (created by the IDE), which clears the graphics device using a specific colour and prepares the device for output. You can read all about this in the documentation that comes with XNA (Application Model overview in Help > Contents > XNA > Programming Guide).
In order to draw our graphics, we need to use the SpriteBatch class. Place the following code inside the Draw() method of Game1.cs, just after the "//TODO: Add your drawing code here" line:
// TODO: Add your drawing code here
spriteBatch.Begin(SpriteBlendMode.AlphaBlend);
spriteBatch.Draw(t_paddle1, new Rectangle(paddle1.pos.X, paddle1.pos.Y, t_paddle1.Width, t_paddle1.Height), Color.White);
spriteBatch.Draw(t_paddle2, new Rectangle(paddle2.pos.X, paddle2.pos.Y, t_paddle2.Width, t_paddle2.Height), Color.White);
spriteBatch.Draw(t_ball, new Rectangle(ball.pos.X, ball.pos.Y, t_ball.Width, t_ball.Height), Color.White);
spriteBatch.End();
The SpriteBatch.Begin method indicates that we want to start drawing textures (sprites) to the device, and the SpriteBlendMode.AlphaBlend property enables transparency support for the textures. We need this because the PNG graphics have transparency in them. The SpriteBatch.Draw method adds a sprite to the list of sprites to be drawn, and takes as parameters the Texture2D object representing the sprite, the location and size of the sprite (as a Rectangle) taken from the Paddle or Ball objects, and a colour to use for channel modulation. Use Color.White to draw the sprites in their original form. SpriteBatch.End ends the drawing and restores the device.
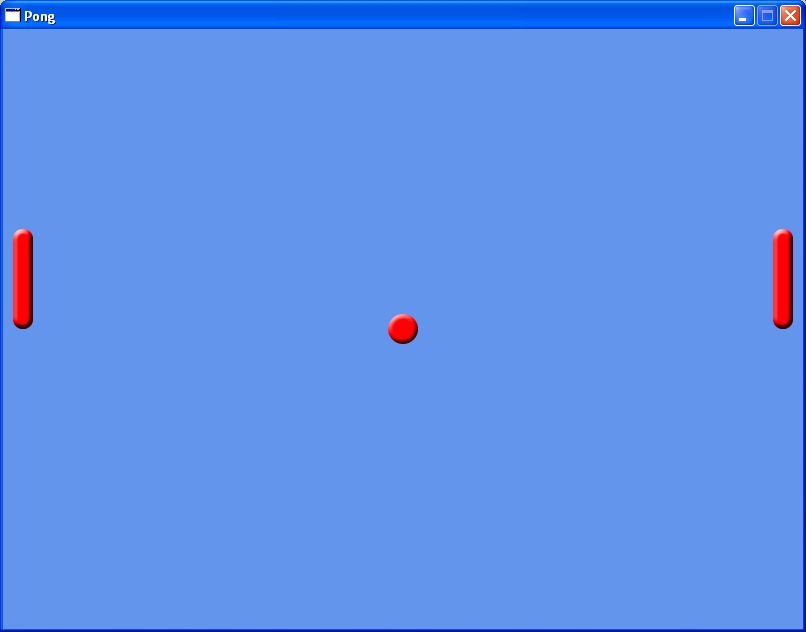
If you compile and run your program (F5), you should get a Window with 2 paddles on each side and the ball in the middle. Of course nothing is moving yet, so we'll get to that right away.
Keyboard Input and Movement
The paddle on the left will be the player's paddle, which he will control using the arrow keys on the keyboard. Obtaining user input from the keyboard is simple in XNA. The best place to put code that performs all your game logic is the Update() method of the Game1.cs class. We will create a method UpdatePaddles() which will be called from the Update() method. The first thing we do in the UpdatePaddles() method is to check for an user input from the keyboard. Add the following code after the Update() method:
void UpdatePaddles()
{
//get keyboard keys
currentState = Keyboard.GetState();
Keys[] currentKeys = currentState.GetPressedKeys();
//check for up and down arrow keys
foreach (Keys key in currentKeys)
{
if (key == Keys.Up)
paddle1.pos.Y -= paddle1.speed;
if (key == Keys.Down)
paddle1.pos.Y += paddle1.speed;
if (key == Keys.Escape)
this.Exit();
}
}
We still haven't declared a KeyboardState object in the class, so we will do that now. We also need a Random object for later on, so declare these two just before the constructor of the Game1.cs file:
Random rand = new Random();
KeyboardState currentState;
Also make sure you add a call to the UpdatePaddles() method inside the Update() method, just after the "// TODO: Add your game logic here" line:
// TODO: Add your game logic here
UpdatePaddles();
The Keyboard.GetState method returns the current state of the keyboard. Then we use the KeyboardState.GetPressedKeys method to obtain a list of keys that are being pressed at the moment. Finally we loop through all the keys that are pressed and perform anything we need according to which key is pressed. In the case that the Up key is pressed, then we move the paddle upwards according to its speed. If the Down key is pressed, then we move the paddle downwards. Also we check if the Escape key is pressed and we Exit the game if so. If you run the program, you should be able to move the paddle up and down using the Up and Down arrow keys.
Now all we need to add to the UpdatePaddles() method is some code that moves the other paddle according to the position of the ball, and also perform some bounds checking to make sure the paddles do not move off-screen. Add the following code to the UpdatePaddles() method:
//paddle to move according to ball
if (paddle2.pos.Y + (t_paddle2.Height / 2) > ball.pos.Y)
paddle2.pos.Y -= paddle2.speed;
else if (paddle2.pos.Y + (t_paddle2.Height / 2) < ball.pos.Y)
paddle2.pos.Y += paddle2.speed;
//check boundaries
if (paddle1.pos.Y <= 10) paddle1.pos.Y = 10;
if (paddle2.pos.Y <= 10) paddle2.pos.Y = 10;
if (paddle1.pos.Y + t_paddle1.Height >= Window.ClientHeight - 10)
paddle1.pos.Y = Window.ClientHeight - t_paddle1.Height - 10;
if (paddle2.pos.Y + t_paddle2.Height >= Window.ClientHeight - 10)
paddle2.pos.Y = Window.ClientHeight - t_paddle2.Height - 10;
The code simply checks the Y values of the paddles in relation to the screen and the ball to make sure that the paddles never move off the screen and the computer's paddle follows the ball.. Read through the code, it is not difficult to understand. There are some hard-coded constants involved, such as a border of 10 pixels so that the paddles never touch the sides of the Window.
We also need to move the ball around, and we will do this inside a new method, UpdateBall(). Add the following code to the Game1.cs file, just after the UpdatePaddles() method:
void UpdateBall()
{
//update positions
ball.pos.X += ball.h_speed;
ball.pos.Y += ball.v_speed;
//check for boundaries
//bottom
if (ball.pos.Y > (Window.ClientHeight - 10 - t_ball.Height))
ball.v_speed *= -1;
//top
if (ball.pos.Y < 10)
ball.v_speed *= -1;
}
In this code we simply update the positions of the ball according to the speeds inside the Ball object. We also check whether the ball has hit the top and bottom borders and change its direction if so by negating the vertical speed. Make sure you add a call to the UpdateBall() method in the Update() method, just after the call to UpdatePaddles():
// TODO: Add your game logic here
UpdatePaddles();
UpdateBall();
If you run the program now, everything should be moving, but you'll see some weird behaviour. All we have left is to implement collision checking between the ball and the paddles.
Collision Detection
All we have left to do is to detect when the ball collides with one of the paddles, and bounce it off. This code will be placed inside a method CheckCollisions(), which you can insert into the Game1.cs file just after the UpdateBall() method:
void CheckCollisions()
{
//check paddle1 if ball moving left, else check paddle2
if (ball.h_speed < 0)
{
//check if ball has surpassed paddle
if (ball.pos.X < paddle1.pos.X + 20)
{
//check if ball has hit paddle or went through
if ((ball.pos.Y + t_ball.Height < paddle1.pos.Y) || (ball.pos.Y > paddle1.pos.Y + t_paddle1.Height))
{
//LOST!
ResetGame();
}
else
{
//ball hit - calculate new speeds
//speed of ball changes randomly - 3 to 6
if (ball.h_speed < 0)
ball.h_speed = rand.Next(3, 7);
else ball.h_speed = rand.Next(-6, -2);
if (ball.v_speed < 0)
ball.v_speed = rand.Next(3, 7);
else ball.v_speed = rand.Next(-6, -2);
}
}
}
else
{
//check if ball has surpassed paddle
if (ball.pos.X + t_ball.Width > paddle2.pos.X)
{
//check if ball has hit paddle or went through
if ((ball.pos.Y + t_ball.Height < paddle2.pos.Y) || (ball.pos.Y > paddle2.pos.Y + t_paddle2.Height))
{
//LOST!
ResetGame();
}
else
{
//ball hit - calculate new speeds
//speed of ball changes randomly - 3 to 6
if (ball.h_speed < 0)
ball.h_speed = rand.Next(3, 7);
else ball.h_speed = rand.Next(-6, -2);
if (ball.v_speed < 0)
ball.v_speed = rand.Next(3, 7);
else ball.v_speed = rand.Next(-6, -2);
}
}
}
}
Make sure you add a call to the CheckCollisions() method in the Update() method, just after the call to UpdateBall():
// TODO: Add your game logic here
UpdatePaddles();
UpdateBall();
CheckCollisions();
The CheckCollisions() method works like this: First we check whether the ball is moving left or right, so that we only check if the ball is going to collide with one paddle or the other. Then we check if the ball's X position has surpassed the paddle's X position, and if so, we check if the ball was in the range covered by the paddle, using the Y positions. Finally if the ball has hit the paddle, we calculcate random values for the speed of the ball and change its direction (so no fancy collision physics here). If not, then we call the ResetGame() method and the game resets. In a normal game you would increase scores, check for any power ups etc. but we're keeping it simple here.
Conclusion
Well, that's it folks. The new XNA framework really makes it easier to start programming in DirectX, and I hope the XNA team keep doing a good job.We only saw a small part of it, and of course the game we made is simple and can be much elaborated upon. This was also my first ever tutorial, so i hope you liked it and found it useful. Email me here with any comments or suggestions you might have.
|

